Planescape review: Squaring the Circle
For the last three years, I've run a Planescape1 campaign through almost all of its modules. Now, after successfully finishing it, I want to look back and review these adventures, highlighting the pros and cons of each one.
Each module will be rated in three categories, up to 3 points in each:
- Presentation: how easy it is to understand and run the adventure.
- Openness: how open the adventure's scope is, regarding the freedom of choice.
- Quality: Overall quality of the adventure, including the originality and richness of its content, and players' enjoyment.
The full list of currently published reviews is available under the planescape tag.
Squaring the Circle
In which our Heroes infiltrate a Fortress that squats in the Abyss and another that lumbers across Baator to deal the Fiends a blow unparalleled — by stripping away their Power to travel the planes at will.
- Designers: Colin McComb and Monte Cook
- Source: Hellbound: The Blood War / War Games2
- Party: 4-6 characters of 9th-10th levels
- Play-time: 3 sessions
- Locations:
- Sigil
- Outlands / Torch
- Gehenna / Khalas (L1)
- Abyss / Indifference (L348) / Fortress of Indifference
- Baator / Maladomini (L7) / Malatanni, the abandoned city
- Gray Waste / Oinos
Overview
An old priest from an obscure fiend-ravaged Prime world claims that he saw the player characters in his dreams, where a mysterious deva had instructed him to find the heroes who can do the unthinkable — take away the fiends' innate power to teleport without error. That is, take it from ALL fiends in the multiverse forever. As the old man tells, this power is granted to the fiends by an ancient foul abomination by the name of the Maeldur Et Kavurik, who is acting as a sort of interplanar guide to them.
Finding the information about the whereabouts of the creature is a challenge by itself. The characters must employ their previous connections, find some reliable informers, or sift through a vast selection of books in Sigil's Great Library. The latter source will grant an important clue about the Maeldur's origins and its "creator's" possible whereabouts. This information will lead the party through a chain of locations and encounters in the gate-town of Torch until they finally find an abandoned haunted mansion and its reclusive owner, baernaloth by the name of Daru Ib Shamiq. Surprisingly, the fiend agrees to aid the party on a single condition — instead of killing the Maeldur, they must swear to set the creature free. Once the character does this, the fiend tells them about a magical gem that can reveal the Maeldur's location.
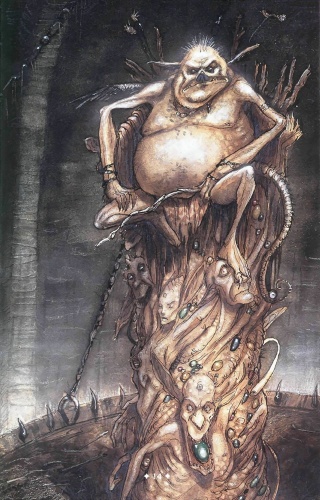
Following this new lead, the party will travel to the 348th layer of the Abyss through a portal hidden in an old abandoned inn in Sigil's Hive Ward. The frigid desert of this layer is ruled by Tapheon from the Fortress of Indifference. This foul tower is a grim black iron construction with thousands of human and inhuman bodies woven into it, some still alive. After traversing five levels (and about two dozen labeled rooms) of this living nightmare of rotting flesh and dealing with its monstrous denizens, the characters confront the dreadful Tapheon. This twisted nalfeshnee wields a thoroughly evil artefact called the despoiler of flesh — a 3-foot-long wand sewn from dozens of saliva-dripping tongues, possessing a power of reshaping any living or dead flesh. Fiend's gem-encrusted throne is made of six flesh-warped slaves; the biggest of the gems is the artefact the party is after. Sadly, the module does not provide an alternative approach to obtaining the gem, thus, the characters are mostly limited to the violent solution. By using the gem, the characters finally discern the current location of the Maeldur — Maladomini, Baator's 7th layer. Additionally, the artefact translates the user's speech to the ancient language of baernaloths, the only one the ancient creature understands.
On their way back, the characters have a weird dream hinting at how the Maeldur's power works. By knowing a fiend's name, the creature can allow this fiend to teleport to any part of the multiverse without error. And yet, the enslaved abomination doesn't know its own name and thus cannot escape its captivity. The dream also hints at one possibility of taking this power away without killing the creature — by submerging it into the river Styx, whose waters can wipe out all its memories altogether.
The path to Maladomini takes the party through the abandoned mines under the city of Malatanii, one of the many abandoned cities of this layer. Though abandoned, this place still has a population of petitioners and runaway slaves, along with more exotic creatures. The leader of this motley group is a fallen solar Archimedes. This neutrally-aligned aasimon enforces some level of peace and order throughout the city, seeking to protect his subordinates from baatezu.
Not far away from the city, the peak achievement of the baatezu warfare technology — the mobile fortress Relentless rolls through the bleak landscape, its torment engines powered by the pain of the tortured prisoners. This 700-feet-long monstrosity is the current location of the Maeldur, captured in a recent baatezu attack on an arcanaloth lair on Gehenna. Not knowing what the abomination really is, the commander of the Relentless, the pit fiend Lydzin, plans to transport her prize to Nessus, the 9th layer, and present it before the Dark Eight themselves.
Once the party manages to get on board of the Relentless, they may explore its castle and the abode of commander Lydzin (and raid her collection of treasures), go below deck, where the barracks, armories, storerooms, and kennels are located, or go straight to the Maeldur's pool on the main deck. Under the baatezu attacks, the party must tell the abomination its own name and convince it to plunge into the Styx river to forget everything, including all the fiendish names that allow for their teleport without error ability to function.
As soon as this is achieved, the Maeldur teleports to the Styx river, together with the party if they were in physical contact with it. Appearing high above the Gray Waste, the Maeldur will fall down to the river for the next three rounds. Down below, a group of hydroloths is already gathering to collect sediments of thoughts that are known to congeal from the memories lost to the Styx's waters. There can be even more fiendish forces if the characters gave away some information about their mission earlier in the adventure. The party will be assailed by these fiends sans some venue to get away quick enough. If they thought of giving their own names to the Maeldur, they could just teleport to any location they wish, possessing the power of teleporting without error for these few moments before the Maeldur plunges into the river.
If the characters manage to achieve their goal, they are not likely to be believed by most people, and if they manage to present proof of their heroic deeds, the fiends will surely want to take revenge against them. Either way, the landscape of the Blood War is changed significantly with the loss of one of the most powerful fiendish innate powers. Of course, the true winners in this situation are the yugoloths. Once the Maeldur plunged into the Styx river, they recaptured it to hide away again in the depths of Gehenna. Now they can trade the teleportation power to fiends who pledge allegiance to them, bringing their plans of complete domination of the Lower Planes ever so close. If the characters had killed the Maeldur instead, all three groups of fiends would target them to deal with the unruly mortals.
Presentation
🖋️🖋️🖋️ superb
Eight detailed maps (all with scale, some of them with grid) cover all important adventuring locations together with the Visions of War booklet, which has another two full-color maps and nine handouts for this module. The detailed list of possible story awards is presented at the end of the module.
Openness
☀️ linear
Despite each particular location being free to explore, the order of these locations is strictly linear. This fact may not be readily noticeable by the players due to the rich flavor and commendable amount of content presented therein, but it's all pretty much a linear ride from the very start to the end.
Quality
★★★ outstanding
Probably the most METAL Planescape adventure ever conceived. The fight against Tapheon was one of the most memorable and dangerous moments of the whole campaign for the players. I highly recommend this module either as a standalone adventure, together with the two previous ones in this collection, or as a high point of any campaign with a strong Lower Plane focus.

Discuss this post on Reddit


