LyX Editor
When you first start using LaTeX, it can be a bit overwhelming due to the sheer number of tools and possibilities at your disposal. And even when you eventually get accustomed to it, sometimes you might want to write something quickly, not worrying much about the style and layout — by just throwing your ideas onto the "paper" to be sorted out and brought up to the publishing-level quality at some later date. That's where LyX comes in handy.
What you must keep in mind when working in LyX, is that it's not your usual WYSIWYG word processor. Instead, it is positioned as a WYSIWYM document processor focused on writing and document structure instead of its appearance. Going over the full list of LyX's features would not only take an unreasonably large amount of time but would also be quite redundant given the existence of detailed official documentation. Instead, I will share some tricks from my own experience of working in LyX and trying to do some not readily obvious things with it.
Document Settings
All of these can be found in the Document → Settings… window:
- The two-column document can be made by entering
twocolumninto theDocument Class→Class Options→Customfield. - Enable
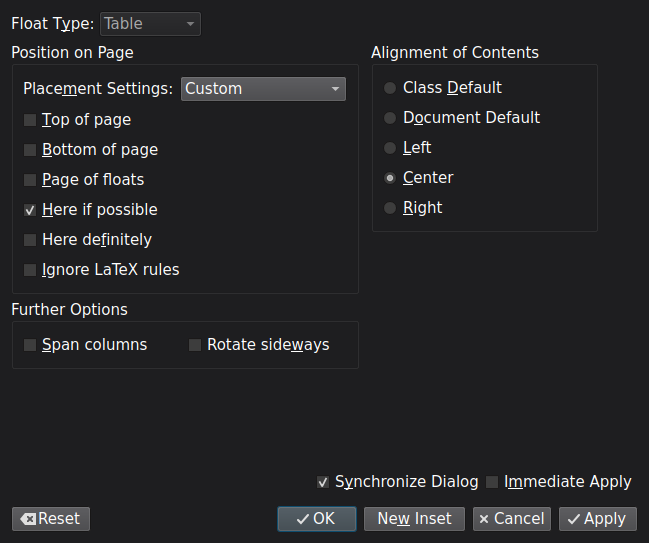
PDF Properties→Use Hyperref SupportandBookmarks→Generate bookmarks (toc)checkboxes to automatically create a "Contents" sidebar for your PDF. Float Settingsallow you to set up the preferred default options for all floats.- Likewise, the
Bulletspage allows you to set up the default unnumbered list's bullets style. - You can use the
LaTeX Preamblewindow to include a LaTeX package not covered by the availableModules, create custom commands, etc.
Floats
Just like in LaTeX, you can place your tables into floats by first doing Insert → Float → Table, and then Insert → Table… to insert a tabular inside it. You can access the settings of the floats and tabulars from the right-click menu or by pressing a Ctrl+Alt+I shortcut.
As you can see, one of the main advantages of LyX is a friendly and intuitive interface for constructing tabulars, which is especially handy when you are not sure what table structure you want.

In the same way, you can insert images with the Insert → Graphics… dialog. By clicking on the inserted image you can adjust its basic properties, such as scale, rotation, crop, etc. Keeping in mind that the image displayed size isn't related to the size it would be rendered in the final document, adjust its "working" appearance at the LaTeX and LyX options tab. Not only you can set its Scale on screen, but also Revert colors in dark mode (quite useful for black-and-white illustrations), or even hide it entirely by disabling the Show in LyX checkbox. In that case, it will be shown as a small rectangle with the image's file name.
LaTeX code insertion
By pressing Ctrl+L you can insert a raw LaTeX code at the specified place of your document. This helps greatly if you need to achieve some specific behavior not covered by LyX directly.
For example, here's how you can make a custom table of contents (for this to work you also need to set the Document Class to Book (Standard Class)):
\setcounter{tocdepth}{1}
\makeatletter
  \chapter*{\contentsname
    \@mkboth{%
      \MakeUppercase\contentsname}{\MakeUppercase\contentsname}}%
  \@starttoc{toc}%
\makeatother
Exporting to LaTeX
While you can view (Ctrl+R) and export (File → Export menu) directly into PDF (and a bunch of other formats), you might want to transfer your work into LaTeX code first. This is easily done with the File → Export → Latex commands. All exports will appear in the document's working directory.
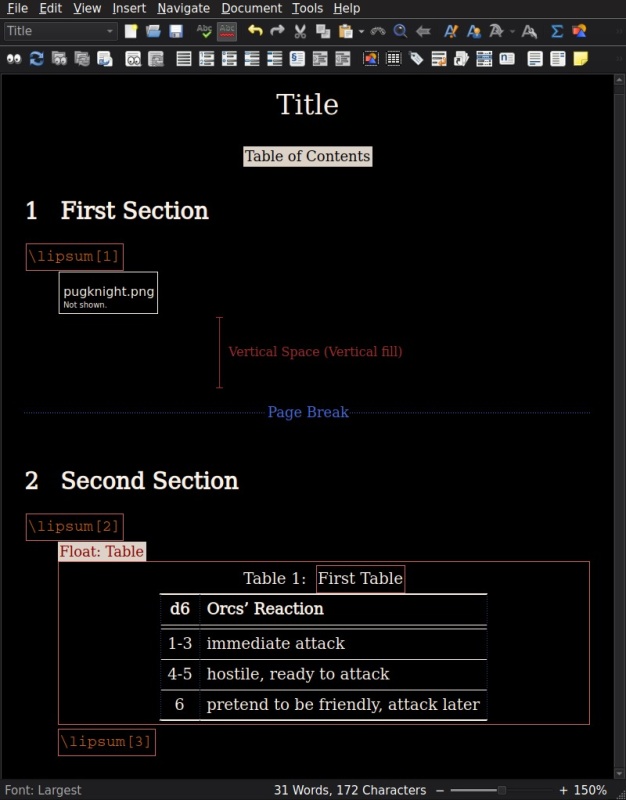
For example, that's how our small document looks in Lyx:
And here's what it exports into with the Latex (pdflatex) command:
%% LyX 2.4.3 created this file.  For more info, see https://www.lyx.org/.
%% Do not edit unless you really know what you are doing.
\documentclass[american,twocolumn]{article}
\usepackage[T1]{fontenc}
\usepackage[utf8]{inputenc}
\usepackage{babel}
\usepackage{booktabs}
\usepackage{graphicx}
\usepackage[pdfusetitle,
 bookmarks=true,bookmarksnumbered=false,bookmarksopen=false,
 breaklinks=false,pdfborder={0 0 1},backref=false,colorlinks=false]
 {hyperref}

\makeatletter

%%%%%%%%%%%%%%%%%%%%%%%%%%%%%% LyX specific LaTeX commands.
%% Because html converters don't know tabularnewline
\providecommand{\tabularnewline}{\\}

%%%%%%%%%%%%%%%%%%%%%%%%%%%%%% User specified LaTeX commands.
\usepackage{lipsum}

\makeatother

\begin{document}
\title{Title}

\maketitle
\tableofcontents{}

\section{First Section}

\lipsum[1]

\includegraphics[width=1\linewidth]{pugknight}\vfill{}

\pagebreak{}

\section{Second Section}

\lipsum[2]

\begin{table}[h]
\centering
\caption{First Table}

\begin{tabular}{cl}
\toprule
\textbf{d6} & \textbf{Orcs’ Reaction}\tabularnewline
\midrule
\midrule
1-3 & immediate attack\tabularnewline
\midrule
4-5 & hostile, ready to attack\tabularnewline
\midrule
6 & pretend to be friendly, attack later\tabularnewline
\bottomrule
\end{tabular}
\end{table}

\lipsum[3]
\end{document}
Importing LaTeX code into LyX is also supported (File → Import → LaTeX (plain)), but it won't look as pretty as the original LyX document due to the lack of LyX display settings in the LaTeX source.
Discuss this post on Reddit