Dungeons & Disc Jockeys
So you are a game master and seek for a way to level up your game ambience? In that case you might want to look into using DJ software and audio streaming. Below, I will describe my personal setup and present some useful tips for this.
The client side
Mixxx1 — is free and open source cross-platform DJ software. You would not probably use even half of its features, but it will surely get the job done.
Here's its main window interface:
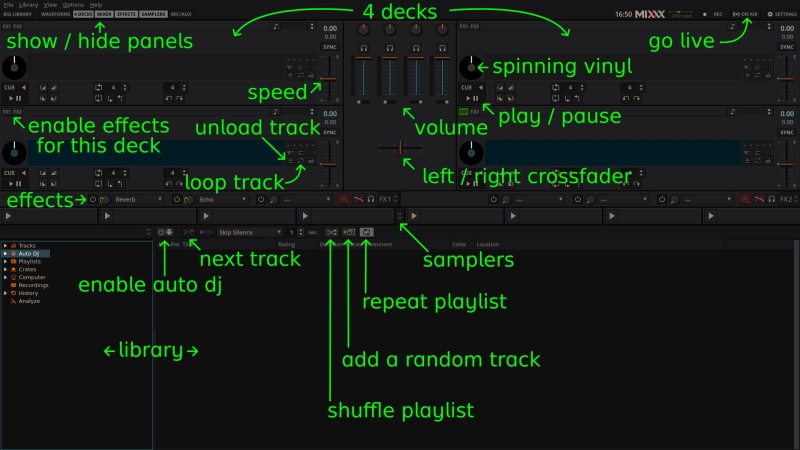
I've marked the most important controls and will go over them below.
Tracks
First, you need to add some tracks to your Library. Go to Main Menu → Options → Preferences (or press Ctrl+P), switch to Library tab and add some Music Directories. Afterwards, do Main Menu → Library → Rescan Library. You will need to rescan the Library each time you update its contents. Now, all tracks should be visible in the Tracks tab of your Library panel.
Crates and playlists
Kinda similar in function, but not exactly. For one, crates can be set as a source for the Auto DJ to pull tracks from, and playlists can be added into the Auto DJ queue directly.
For example, I can have an "ambient" crate with all of my ambient tracks, and then add them into a bunch of playlists, like "battle", "mellow", "menacing", "somber", "tavern", etc. When I need to switch the ambient mood, I just right-click on a playlist and choose Add to Auto DJ Queue (replace). Afterwards, I shuffle the queue and trigger the transition to a new track.
Colors
You can color-code each track if you like, to differentiate them. For example, "battle" tracks are red, "forest ambient" ones are green, etc. Accessible through right-click menu: Select Color.
Auto DJ
Your main tool of choice. After filling up its playlist, just click the Enable Auto DJ button and it will use the top two decks to play selected tracks one after another. You can rearrange the queue as you wish, shuffle it, or trigger the transition to the next track manually.
Decks
Drag and drop tracks here and hit Play/Pause button. You have a lot of DJ tools you would barely use for our purposes. Most useful are shown on the picture above.
Volume and crossfader
Each of the four decks had its own volume controls, and crossfader slider allows for a smooth transition from the left to the right side decks when you switch the track. Auto DJ uses it automatically.
Samplers
Drag and drop short sound effect tracks here to play when needed. The central "top-down" button expands these into a set of "mini-decks" for a more precise control.
Effects
Very optional, but sometimes you just need to play with some echo and reverb for your cavern tracks. There are a lot of options here, and you can combine them in different configurations and proportions. Effects must be enabled for each deck by engaging FX# buttons.
The server side
Now, to the tricky part.
To broadcast live, you need a streaming server for Mixxx to connect to. If your Internet provider's config allows it, I recommend self-hosting, and otherwise you must settle with a third-party solution.
Self-hosting
Icecast2 is a solid choice. Also, it's free and cross-platform. The configuration mostly consists of editing the icecast.xml config file, and described in detail in the official documentation3, as well as a brief version in the Arch Linux wiki4.
Third-party hosting
There are online services providing Icecast or Shoutcast server access for free, e.g. Caster.fm5. One of a downsides of a third-party hosting is that you should expect a considerable lag between your machine and server output, so keep this in mind.
Connecting to the server
After you configure and start the server, you must create an entry for it in Mixxx. Go to Main Menu → Options → Preferences (or press Ctrl+P), switch to Live Broadcasting tab and add a new Live Broadcasting source connection.
The default connection options for a self-hosting Icecast server (if you didn't change them in the config file) should be:
- Type: Icecast 2
- Host: localhost
- Login: source
- Mount: /live.mp3
- Port: 8000
- Password: (whatever you set it to) And a third-party service will provide you with these details instead.
When all this stuff is done, you should be able to go live by clicking the Enable Live Broadcasting button in the top-right corner of Mixxx window.
Listening to the stream
Now, just start a track and open the server address (localhost:8000/live.mp3 for you, or your IP instead of the localhost part for your listeners) in your music player of choice. If you want to get fancy, you may also consider getting a custom web address for your IP through Duck DNS6 or any other similar service.
For a third-party server, your listeners should be able to open your-username.caster.fm address where the online player will be located.
If your listeners experience stuttering audio, try lowering the Bitrate option in Mixxx's Live Broadcasting config tab.
So, here you go. I hope I've covered all the basics, and you can go from here, assembling your own library of awesome ambient and sound effects!

Discuss this post on Reddit